Bobby K
.060 Over
Just installed my Eastern Beaver (Love that name) H4 Dual Headlght Relay Kit on my 05 Rocket.
Don't even think about putting the relays and/or unused old plugs in headlight shells. They don't fit, I tried.
Also. remember the small screwdriver type tool we used to change out the terminals for the GI-PRO, well you will need it again, also a pen and paper.
Step one: Raise gas tank, remove headlights from housings, remove right side plastic headstock cover from frame above radiator.
Step two: Trace headlight wires to connectors under tank, unplug connectors and pull headlight wires from open headlight housing end to remove.
Step three: Remove plastic female headlight plugs from relay wiring harness, using jewelers screwdriver or other tool. Be careful not to stab yourself (I did), and write down where each color wire goes.
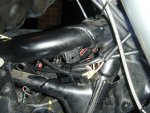
Step four: Starting on the right hand side of frame, right behind headstock, run relay headlight plug wires to headlights, short one to right headlight, long one to left headlight. After passing wires through holes in headlight housings, replace wires in headlight plugs. Make sure rubber grommet is still in correct place. Headlights then can be plugged in and replaced.
Step five: Plug male plug on relay harness into one of headlight female plugs (see step two) on bikes wiring harness, under tank.
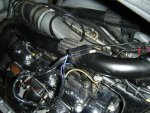
Step six: Run power wires under tank to battery and attach. Install fuse.
Step seven: Use wire ties to secure wiring, push relays to inside of frame, re-install plastic headstock cover and gas tank.
My headlights were noticeably brighter after installation. Kit is high quality.
Don't even think about putting the relays and/or unused old plugs in headlight shells. They don't fit, I tried.
Also. remember the small screwdriver type tool we used to change out the terminals for the GI-PRO, well you will need it again, also a pen and paper.
Step one: Raise gas tank, remove headlights from housings, remove right side plastic headstock cover from frame above radiator.
Step two: Trace headlight wires to connectors under tank, unplug connectors and pull headlight wires from open headlight housing end to remove.
Step three: Remove plastic female headlight plugs from relay wiring harness, using jewelers screwdriver or other tool. Be careful not to stab yourself (I did), and write down where each color wire goes.
Step four: Starting on the right hand side of frame, right behind headstock, run relay headlight plug wires to headlights, short one to right headlight, long one to left headlight. After passing wires through holes in headlight housings, replace wires in headlight plugs. Make sure rubber grommet is still in correct place. Headlights then can be plugged in and replaced.
Step five: Plug male plug on relay harness into one of headlight female plugs (see step two) on bikes wiring harness, under tank.
Step six: Run power wires under tank to battery and attach. Install fuse.
Step seven: Use wire ties to secure wiring, push relays to inside of frame, re-install plastic headstock cover and gas tank.
My headlights were noticeably brighter after installation. Kit is high quality.