Question to the group. I have barnett clutch pads and steels along with springs installed. Spring Judder installed but when i took it apart no seat judder spring. I am thinking that barnett systems do not require the Seat Judder Spring. I honestly do not remember and can not find any info on this.
Barnett fibers are all the same size and do not require judder springs. 2 judder springs should have come out the one thats not flat and a flat one, if you dont have the flat one it may be stuck to mating surface of case
Just my opinion
From reading posts and my experience
What triump calls the judder spring in auto trans is called a cushion spring. Its job is to cushion the apply so u do not have a harsh apply or chatter. If u were building a race bike then leave it out.
If it was mine i would use (if it looks good) the original clutch with the thin lining and the judder spring.
By no means a race bike. I replaced the clutch pads and steels a couple of years ago with the barnett kit. Springs included. The spring judder was installed but no seat judder spring. There had to be a reason I left the seat judder spring out. (thin one) Tried to research all this but had no luck. You both present good sound advice.
My little phone is a prob for me looking up info
As i rememver either the barnet or mtm (?) Clutches did not have one of the clutches trimmed for the judder spring so if u run the judder on that clutch u will have that material tore off the clutch and in the oil system.
My age is catching up with me because i can not remember about the piece u r refurring to.
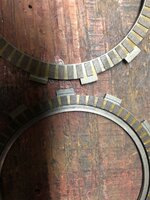
Found it. Since i have a later year kit in my bike the judder spring and seat can be installed due to one ring being a bit larger than the rest. Thanks guys for the input it got me looking in the right direction. Why i did not install the seat judder spring is still a mystery. Like the picture below
Starter was installed after pic.
New stator. New gaskets. Sealed with permatex which holds the gaskets in place. Loctite 242 which locks the bolts in place. Proper tools for the job. Along with a few good torque wrenches.
Life goes on. Right tools and the right attitude. Speed means nothing if you can not run over 100,000 miles on a rebuild. Get her built in two days and then trailer to where you need to Go? Get her built to run over 200 MPH just to tear her apart a month later ? NOT. Do it right the first time and ride many of miles. The output shaft was a piece of cake. Then again even with the right tools and attitude you still need the Key ingredient
Im the guy that did the two day thing, i just wanted to ride and have fun, not go 200mph, well ok that part nails it, im not feeling much love here. But i know you do so there
Kevin I am by no means referring to you. I enjoy reading about your crazy build and can understand and enjoy your excitement. Along with that have learned a few things here and there by reading your post on your build.


")
