Just Installed A Tachometer On My R3T

Okay, I just got back from a ride in a effort to check out the accuracy of the tachometer I installed. I failed to look at the chart I made months ago before going on the ride and I was a little concerned the tach RPM might be running a little bit behind or slow. I developed the chart, I am posting, based on input from fellow roadster riding forum members who have a tach. They were kind enough to give me some corrected numbers by which I created the chart.

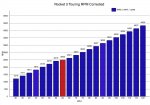
My speedometer has been corrected to read as it should with PowerTripp's tuning for the R3T. I checked the speed against my GPS as well. I am happy to report that all of my speeds up to 75 (that's as fast as I went) are spot on with the chart. At 75mph the tach was reading 3k, 55mph was showing around 2300, 65mph was showing around 2500-2600, so it looks like we are good to go. The needle is very stable and updates in less that 0.5 seconds. There is no bouncing. Now you can put a tach on your rocket if you want.

Here is a copy of the chart I developed. It is only accurate if you have correct your speedometer with TuneECU. With Triumphs speed you are actually going about 4.5 mph slower than what the speedometer reads.
 

Attachments

  • image.jpeg
    image.jpeg
    114.1 KB · Views: 21
@Bedifferent The bike is buttoned up, and no response from the tachometer.

That is, it is powered, lighted display, and performs the needle sweep on power-up.

I dare say I find the setting instructions intimidating.

As far as I know, I followed your installation as close as I could not having your bike physically present for inspection.

I connected to the middle coil, the terminal with the green/purple wire.

Might you provide the setting sequence and settings you used that work, please ?

Thank you.
 
Last edited:
Maybe @Bedifferent can advise exactly which wire to attach to - the Positive of the Negative

I noted in the Koso instructions -

Connect the RPM wire (type B) to the ignition coil positive pole.

That seems conuter-intuitive to me, since the actual coil drive signal is the negative;
however I also note that a lot of the other methods for the Koso are not even direct connection, just an induced signal;
so it may be working on a very low threshold signal that is being detected on the Positive

Sorry if I steered you wrong there - that is just very atypical for a tach connection, which invariably always use the coil switching signal for most brands
 
Okay guys, @Joesmoe and @DEcosse ...I will say the instructions are a little cryptic, but somehow I got into the settings mode. I'll try to explain later. Just as a note. I put the "split off wire connector" on the outer most coil terminal of the middle coil because it was the easiest to get to. As I recall, I had no reading (it was flat) until I was able to change the signal type setting. Once I changed that, it took off working. Once you get a reading you can cycle through the piston number options (if needed) until it matches what appears to be the idle speed and that was it.

With the engine running, you have to "hold" the "select" button and the "adjust" button for 3 seconds to get into the settings mode. That will bring you (I believe) into the first "piston setting" mode without the need to momentarily hit the select button to get into that mode. The piston setting mode will do you no good because you have no reading. You will have to "momentarily" hit/push the select button again to take you to the "signal type setting mode " where you will need to hit the "adjust" button to toggle between the positive or negative pulse. When you hit/push the "adjust" button in this 2nd setting you should now see a reading on the tach. Hitting the select button once again will put you in the "brightness adjustment mode" where you can toggle through the brightness levels with the "adjust" button. To "exit" the settings mode you need to push and "hold" the "select" button for 3 seconds. The point is...you will have to hold the "select" and "adjust" buttons for 3 seconds in order to get into the "Settings" before you can toggle between piston, pulse and brightness. You will have nothing until you get to the pulse mode and switch it.

In the "normal operating mode" if you hit the select button momentarily the needle will indicate the highest RPM reading you have hit...to clear the reading hold the adjust button for 3 seconds.

Just remember, you can cycle through the ajustments once you get into the settings mode by holding the "select" button and the "adjust" button for 3 seconds. You can then cycle to the number of pistons, pulse and brightness adjustments with the "Select" button and make changes in each parameter by hitting the "adjust" button.

Yes, there are a variety of ways that Koso describes to get a trigger signal, but taking it off the coil wire has work flawlessly without any issues.
 
Last edited:
Maybe @Bedifferent can advise exactly which wire to attach to - the Positive of the Negative

I noted in the Koso instructions -


That seems conuter-intuitive to me, since the actual coil drive signal is the negative;
however I also note that a lot of the other methods for the Koso are not even direct connection, just an induced signal;
so it may be working on a very low threshold signal that is being detected on the Positive

Sorry if I steered you wrong there - that is just very atypical for a tach connection, which invariably always use the coil switching signal for most brands

It made no sense to me either, but since the tach is set by default to trigger on Hi or positive, it doesn't work until it is switched to the Low or the negative setting. No reading until that setting is accessed and changed on the tach. It took a bit for me to understand the instructions as I didn't take the time to read and get them in my head. After studying the sheet, sort of after the fact, I got the idea.
 
As an after thought and I'm not sure if I made this clear....Once you hold the select and adjust buttons for 3 seconds to enter the settings mode, I am not sure whether you need to momentarily hit the select button to get to the first "piston setting" or whether you are already there as I think. You'll have to play with it @Joesmoe. The worse you will have to do is go back to the piston setting later to make adjustments to get it to read correctly. The main thing is to get it working by changing the "pulse" setting.

Whoa, whoa, whoa....TAKE NOTE...I made a correction to my above posts. I incorrectly said originally that you had to hold the "select" button for 3 seconds. I changed it to....you have to hold both the "select" and the "adjust" buttons together for 3 seconds to get into the settings.
 
Last edited:
That also explains why the instruction says to connect it to the coil POSITIVE - because the default 'pulse' setting is for a POSITIVE pulse.
But I would expect that negative would be the 'norm' much moreso that positive so it's really odd they picked those defaults.

As you say @Bedifferent, it pays to read the whole thing :D
but their documentation in general is pretty poor I would have to say. Congratulations on deciphering that!
 
I did change the pulse setting, and got it to read.

It is obviously off in the math though, and according to the instruction sheet there should be six or seven settings as I see them, and when I cycle through that (or I may just be totally off) it seems only three positions of the needle are available, and it cycles through those three.

So I'm not quite there yet.
 
Back
Top