3800 Lumen LED Headlight

No he won't
I investigated the idea a while ago (made something to fit in an H4 hole anyway) - Not entirely convinced :cool: - For a start the LEDs need to point back into the reflector more.:Tip-Hat:

Waiting on a guy on R3.net with a proper light meter to test these against Daymakers.

iv a lux meter I plan to use too. Wrt reflection dont h4 filament bulbs just throw light out the sides of the bulb too?
 
iv a lux meter I plan to use too. Wrt reflection dont h4 filament bulbs just throw light out the sides of the bulb too?
It's near enough Spherical emission - although on DIP the graves shield reduces this.
The idk-LEDs are putting out near hemispherical light. So anything that does not hit the reflector is lost as scatter really.
 
No he won't
I investigated the idea a while ago (made something to fit in an H4 hole anyway) - Not entirely convinced :cool: - For a start the LEDs need to point back into the reflector more.:Tip-Hat:

Waiting on a guy on R3.net with a proper light meter to test these against Daymakers.

It's near enough Spherical emission - although on DIP the graves shield reduces this.
The idk-LEDs are putting out near hemispherical light. So anything that does not hit the reflector is lost as scatter really.


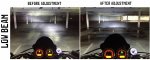
yeah so anyway here's the real life results for the LED headlight conversion;


Conclusion

A clear win for the LED headlights over the stone age wire filament bulbs, even the expensive premium ones.
These LEDs give stronger light, and wider more full beam. They light up any reflective material on the road real good - like road signs etc just light right up even in the distance outside the beam or above the beam.
To me they are an alternative to HID lights. They are almost as good as the projector HID xenon fancy lights my '11 BMW has.

They ignite and illuminate your view instantly, no fraction of a second delay like when halogens or xenons heat up and come on gradually.
They are ice white and look sooooo much better than the piss yellow halogens or non-HID "xenons".
I have a video showing the rocket with 1 standard bulb and 1 LED which illustrates the difference quite well.
The yellow standard bulbs made my white DRL LED ring light devil eyes look ****ty due to the colour difference. now with the white LED headlights they look legit.
You can adjust the beam pattern by adding in a little ring spacer to the bulb that Cyclops include, but i didnt bother. it might or might not improve the delivery of the light.

Now my bike is FULLY LED - headlights, indicators, tail light, brake light, number plate lights.

Only cons are a slight flicker on high beam only, but this is only noticeable when sitting still with a wall or something in front of you, and that they are not readily available in every service station (unlike halogen H4 bulbs).

Highly recommended, and that's coming from a critical ****er who isn't easily impressed, and big shout out to IDK for the heads up :thumbsup::thumbsup:
 
I'd like to see them put up against JWSpeakers etc. I'm intrigued by the "light spots" - Whether they're Reflector or Led caused. But not bad.
 

So for those of us who live in Buerocratia - That Dip beam would fail any test system that enforces ECE lighting regs.

Look at the roof.

This could be easy-ish to address IF it had a shield as most of the electro-magnetic dip/main HID systems have.
HID-Bi-Xenon-Kit-High-and-Low-Beam-in-One-Bulb.jpg

Or if it was incorporated into the light unit as some 7" units have.

Also my mate at the ITV(TüV) suggested one uses lights with patterned lenses to hide them better.

High beam flicker. Odd.
 
right well despite going for several night time spins with lots of traffic about and NOT ONE SINGLE car flashing me (also met a friend out on his bike, he didn't recognize me due to the new lights but when i sent him a text to say yeah that was me he was like ahh those lights really get you noticed. i asked if they were blinding him he said no way not at all, they're just bright) i am a perfectionist/particular bollocks & still fall servant to defeating the naysayers' negativity so i made an improvement to the setup.
sorry for taking over your thread IDK :)

i fitted an o-ring between the LED unit's 'bulb' and the H4 shape metal bezel - this moves the bulb inwards slightly in the reflector without compromising the way the bulb sits into the lamp, changing the angle the light hits the reflector at to be more acute.
i also adjusted the whole headlight units downward a little too from what it was with the stock setup. for those of us with a flyscreen/sports screen or maybe just the mounting kit for them, i swapped out the hex head bolts for some cup head Allen bolts.
this gave some extra clearance to turn the lamps downward a little (they were almost touching the old bolt heads from stock setup)

so anyhoooo here are the results in picture format; the difference is diluted somewhat due to some lights in the carpark working this time, and a pool of water, but you get the idea. much better focus of the light to in front of you, and not as high up the wall either.


also, another pro tip; you can re-fit the stock rubber boots that seal the lamps against moisture on these Cyclops LED units - just remove the H4 shape metal bezel, turn the rubber boot inside out (like putting a sock on a child) and that helps get it on over the LED bulb unit. then the metal bezel can go back on. unfortunately this makes the fitting of the spring which holds the bulb into the lamp a bit trickier than it was, but hey you probably wont have to do it very often.
if anyone needs pics on a how-to, ask.
 

Attachments

  • CYCLOPS Low Beam Comparison Carpark.jpg
    CYCLOPS Low Beam Comparison Carpark.jpg
    119.4 KB · Views: 12
IMG_9654.JPG
sure ian they include a couple of spacers in the pack (or at least they did with mine), but these are basically rolled paper and rapidly absorb moisture and become messy and weak. which is why i used the o-ring. the one i used is about 1/16" id say or 2mm. i didnt trial a thicker one to see if that made things better again.

if you remove the 2 little screws you can remove the meta bezel, for the o-ring to go under.
IMG_9653.JPG

IMG_9655.JPG

IMG_9656.JPG

IMG_9657.JPG
 
IMG_9658.JPG

but before all that i'd advise putting the rubber boot on first, while the bezel is off;

IMG_9666.JPG
 
Back
Top